Are you trying to convert PDF to JPG on Mac? PDFsail makes it easy to convert your PDF files into high-quality JPG images in just a few clicks. Whether you need to extract images, create a PDF-to-image gallery, or simply reduce file size, PDFsail provides a fast, free, and simple solution.
Part 1:How to Convert an Entire PDF File to JPG on Macbook/iMac
If you have a PDF with several pages, the Preview method listed above isn't ideal. Instead, use an Automator Quick Action that will convert all pages from your PDF to JPG at once. This method can process multiple PDF files in one go, too.
To make this Quick Action, first, open Automator on your Mac. Do this by pressing Command+Spacebar, typing "Automator" in Spotlight search, and selecting it in the search results.

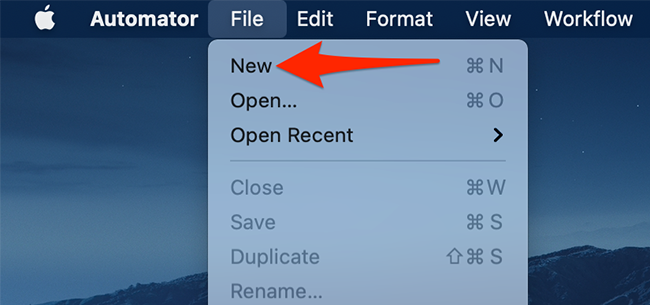
In Automator, select File > New from the menu bar.
In Automator's "Choose a Type for Your Document" prompt, select "Quick Action." Then, at the bottom, click "Choose."

You're now on your Quick Action's editing screen. Here, at the top, click the "Workflow Receives Current" drop-down menu and choose "PDF Files."

In the top-left corner of Automator, click "Actions." Then, click the text field next to "Variables" and type "Render PDF Pages as Images."

From the search results, drag "Render PDF Pages as Images" and drop it onto the workflow on the right.

In the "Render PDF Pages as Images" section on the right, click the "Format" drop-down menu and choose "JPEG Image."
Optionally, click "Resolution" to specify a custom resolution for your image, and click "Compression" to select a compression level for your files.

Click the search box next to "Variables" again. This time, type "Move Finder Items." Then, from the search results, drag "Move Finder Items" and drop it under the "Render PDF Pages as Images" section on the workflow to the right.

In the "Move Finder Items" section on the right, click the "To" drop-down menu and select a folder in which to save your converted JPG files.

Your Quick Action is now ready. To save it, from Automator's menu bar, select File > Save. Alternatively, press the Command+S keyboard shortcut.

You'll see a save prompt in Automator. Here, type a name for your Quick Action and click "Save." This name will appear when you use this action, so use something descriptive. We'll go with "PDF to JPG."

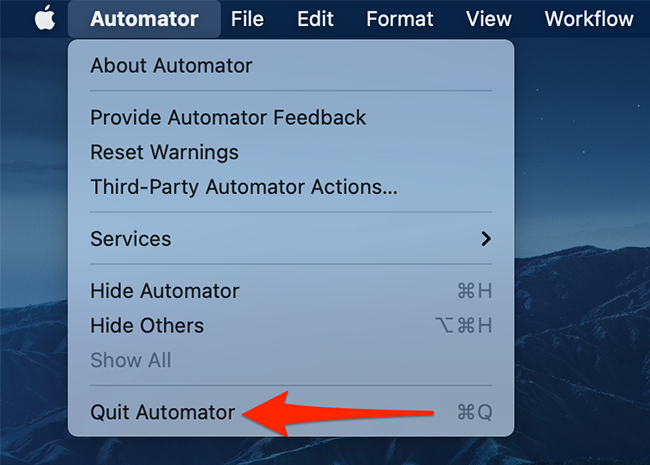
Now that your Quick Action is saved, close Automator by clicking Automator > Quit Automator in the menu bar.
To use your newly created Quick Action to convert a PDF to JPG, first, open the folder that has your PDF file or files.

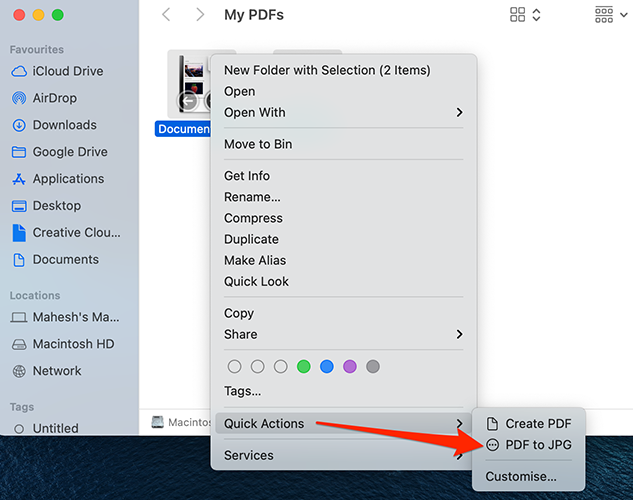
Use your mouse or trackpad to select the PDF files to convert to JPG. Then, right-click any PDF file and select Quick Actions > PDF to JPG. If you used another name for your Quick Action, select that instead of "PDF to JPG."
Automator will immediately start converting the pages of your selected PDF files to JPG. When your files are converted, you'll find them in your specified folder.

Part 2:Why Use PDFsail to Convert PDF to JPG on Mac?
Here’s why PDFsail is the best tool for converting PDF files to JPG images:
1. Fast and Easy: Simply upload your PDF file, and PDFsail will convert it to JPG images in seconds. No software installation required—just visit the website and get started.
2. High-Quality JPG Conversion: PDFsail ensures that your JPG images maintain high quality after conversion. Your text, graphics, and layout will be preserved without any loss of detail.
3. Free and Web-Based: PDFsail is a completely free and online PDF to JPG conversion tool. There are no fees, and you don’t need to install anything on your Mac.
4. Multiple Pages to JPG: Convert multi-page PDFs into individual JPG images with ease. PDFsail lets you select which pages to convert and saves each as a separate JPG.
How to Convert PDF to JPG on Mac with PDFsail?
Follow these simple steps to convert your PDF to JPG on Mac:
1. Visit PDFsail PDF to JPG Tool: Go to PDFsail PDF to JPG Converter.
2. Upload Your PDF: Click the “Upload” button and select the PDF you want to convert.
3. Convert PDF to JPG: Once your PDF is uploaded, click “Convert” to start the process.
4. Download Your JPG: After the conversion is complete, download your JPG images to your Mac.
Why Convert PDF to JPG?
There are several reasons why converting PDF to JPG is useful:
• Image Extraction: Convert specific pages or images from your PDF to JPG for better use in presentations, websites, or social media.
• Easy Sharing: JPG images are easy to share via email, messaging apps, or on social media.
• Smaller File Size: JPG images tend to be smaller in file size compared to PDFs, making them easier to store and transfer.
Conclusion
Now you know how to convert PDF to JPG on Mac using PDFsail. Whether you need to convert a single page or a whole PDF, PDFsail offers a fast, free, and easy-to-use solution.
Visit PDFsail PDF to JPG Converter to start converting your PDFs today!
Recommended for you:
"Looking to convert JPG to PDF? Use our JPG TO PDF Converter."
"Looking to convert PDFs to Word? Use our PDF to Word Converter."